| Jun 24th 2009 Started
work cleaning and checking the two blue doors. Drivers
side first and there wasn't much wrong with it, which is
why I'm using it, just a small bit of rust along the
bottom. First job was to remove the attachments such as
the mirror, window and door handles, and then get to the
inside by prising off the black vinyl trim. This is
always a bit tricky as the trim is rather thin hardboard
that will easily crease up and fall apart under any
stress and the plastic clips that hold it in place are
made from the Worlds most brittle plastic!
To remove the clips safely you need to carefully slide
either flat-bladed screwdrivers, or metal rules, under
the trim and both sides of the clips, then use a gentle
twisting action to lift them up till they just pop off.
Of course you normally find that previous owners have
already tried this and there are always plenty of broken
clips to prove it. Luckily the panel was in good
condition with only a few snapped connectors - and I've
got plenty of spares to replace those.
The first job was to use my power drill, with wire
brush attachment, to remove the flaking rust along the
lower edge, there was a fairly small amount of this under
the drain holes, where over the years the waters caught
in the folded metal door skin. Again I'm using a mixture
of rough sandpaper and green rust-buster gel to remove
it, this will probably take a week. The interior of the
door was also cleaned out in preparation for the
painting, I'll be Hammeriting and undersealing it later.
My reversing lights
have never worked either and I traced this to a broken
wire which goes to a switch/sensor thingy just under the
front of the engine. It looks like it had previously been
broken and repaired - and botched slightly, I did
consider changing all the wires but just quickly soldered
one loose wire to the contact point and job done, I now
have lights.
Jul 1st 2009
Clean up on the doors went well and as the weather was
good I was able to start painting them. The main part of
the inner door is Black, to blend with the vinyl trim,
and I quickly masked this area off and painted them using
a Matt base paint with a Satin top coat. The door lock
was masked off and will remain Blue, the rest of the
inner door edging was painted Silver. I started with
several coats of 'Smooth Silver' Hammerite along the
bottom edge to protect against any future water
penetration then changed to standard Silver car paint for
the sides as it gives a better finish. More Hammerite was
then applied to the inside of the doors. The rubber side
seals were removed and I'll be cleaning them this
weekend.
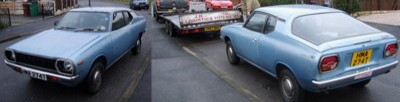
Jul 4th 2009
One long-standing
problem has been the windscreen that has a bad wiper
scratch doing a full arc across the drivers field of
view. This is bound to be an MOT failure - but even more
importantly is a bloody awful annoying sight. So I have
been planning to change the windscreen since I had the
car and have now got a replacement screen from red Datsun
3. However getting the thing off the scrap car was a real
pain, and to now repeat that job and then have to refit
the new glass was a task I no longer wanted to do. So
after a quick visit to ebay a 'Miracle glass repair kit'
fell through my letterbox this morning and I set about
sorting the screen. The kit contains a bottle of 'Special
Fluid', some pads and a drill attachment tool, sounds
easy.
First job attach pads to pad holder, attach this to my
power drill, add fluid and switch on - and spray droplets
of fluid everywhere, the windscreen, the walls, my arms,
my tee-shirt, etc. After an hour I finally realised that
I was simply polishing the scratchs and they were going
nowhere. Useless, but it did smooth off some scuff marks
which gave me a clue.
Putting aside the miracle repair kit I got hold of some
400 grade wet & dry paper and a bottle of Brasso
polish then spent 3 hours sanding down the scratch and
the glass around it, followed by another hour using 1200
grade paper to smooth down the mess I had made. Together
this arm-numbing exercise turned a thin scratch into a 1
to 1& 1/2 inch band of frosted glass which looked a
bit of a disaster. Then the glass repair kit earned it's
description, unable to shift one heavy scratch it could
polish frosted glass to near perfection and after another
couple of hours the windscreen was completely fixed. It's
a miracle!!
Jul 5th 2009
I finished painting the
door sills and then bolted on the replacement doors.
Everything seems to be in line and working properly but I
can't be sure yet as the door rubbers are not attached.
This is because I will be putting more paint on the
window surrounds and also because the rubbers are in a
bit of a state and need a good clean and soaking in that ArmorAll
rubber restorer.
Jul 11th 2009
I decided to tackle the
wheels next as they are one of the last major problems to
sort out. One idea was to get new(er) wheels and possibly
go up a size as the 12" originals are a little on
the small size, however the point of this restoration is
to recreate my first car and it had these type of Pardat
alloys. Unfortunately they are in quite a state and need
refurbishing. So I emailed a company and got a basic
estimate of £230 which I guess is not too bad for five
wheels, but it would certainly have cost more if I had
gone ahead with it, as they would have charged for the
added extra work required to fix the poor condition of
the wheels. As well as that there is also the cost of
five new tires to take into consideration. All in all I
was looking at a bill of around £500 and this project is
already well over budget (well it would be if I had
actually ever set one) so it was time for some
cost-cutting - and that means doing it myself as usual.
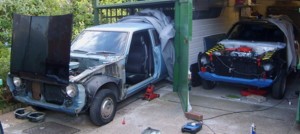
Firstly I jacked up the
spare car, balanced it on supports and took off it's
wheels, then swapped them with the ones on my prime car,
then a quick trip to a garage to get the tires removed.
Then I began the stinky process of applying Nitro
Mors paint stripper - boy does that stuff work fast,
the paint almost leaps off the metal! After a good rub
over with wire wool to remove the last of the
paint/varnish and a wash down the wheels were taken
indoors for the lengthy job off final cleaning and
polishing - not as big a job as it could be as only the
front facings have to be polished, the rest of the wheel
will be painted Black, still it will take me a couple of
weeks.
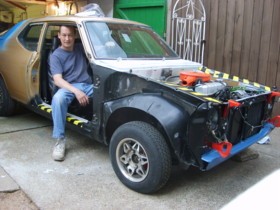
Jul 25th 2009
While discussing my
Datsun problems with a woman at work I mentioned the need
to remove an engine and she offered me her old engine
hoist at a rather cheap price - I must remember to ask
women for car parts and tools more often!
What initially looked like a pile of old scrap pipes
assembled into a rather sturdy frame - and a feeble
looking pair of pulleys and thin rope lifted the engine
out without a problem - although I had to wrap the rope
round a block of wood to stop it cutting into my hand. A
pretty simple one-man job in the end, now I can get rid
of this pile of red rusting scrap.
Jul 26th 2009 Striking gold!
O'dear the budget for
this project just took another hefty knock as I spent big
on body panels. I travelled down to Chelmsford to see a
man who apparently had a new-old-stock rear hatch in his
garage. While I had already done some work last year on
my existing hatch (quite a bit actually) I had noticed
that there were some rust patch's showing again and had
drilled them out, making a mess of it's new paint job.
Rear hatch's seem to constantly rust on these cars so
when I heard of a possible mint'ish replacement then I
was roaring down the motorway in the early hours of the
next day in the quest for this hidden treasure.
First out of the garage
was indeed the hatch for a 120a coupe, covered in light
surface rust but solid and lovely. Then as I carefully
placed it in the back of my car a pair of front wings
appeared, 'Nice', into the back of the car with those
too. Then a mint condition, pristine, never touched,
still wrapped in it's Nissan packaging, chrome front
bumper, 'Very Nice', into the back of the car with that.
Then a mint condition, pristine, still wrapped, rear
bumper, 'Very Nice' again. Then as I tried to close the
boot he pulled out a huge Nissan box with a pristine
bonnet inside! Well I just had to have it, didn't I.
Luckily payday is coming up soon and I can always go
without food.
|