 |
 |
 |
 |
 |
 |
 |
 |
 |
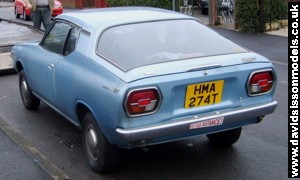
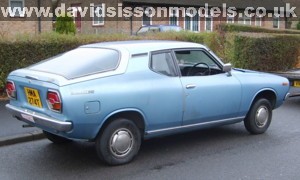
Datsun
120A F11 'Cherry' Coupe - The Sequel
'Restoration 2 - Return of the
Spanner'
| Back to INDEX |
| Well some time has passed since the successful
completion of my Datsun 120a F2 Cherry restoration
rebuild - and I have been merrily driving around in it
with the only regular work being to clean and polish it,
which I'm certainly not complaining about. I've had quite
a few good comments about the vehicle and it seems to
impress people who view it, and I often find myself being
stared at as I drive along - although I think a lot of
people just think 'What the hell is it?'. The older generation tend to come up and say 'I learned to drive in one of those' or 'My dad had one of those', whilst the younger generation often say 'Is it a Mustang?' and 'Show us what it's got mister'. Of course the answer to the last one is 'Not very much with a small 1.2 litre engine'. Also I often hear the comment 'You
don't see many of those around' but of course I do,
as I have another of these rare beasts stored in my
garden! Plus this time maybe I can make a few alterations - like flashier wheels, a throbbing exhaust, and a front spoiler. The last car was a strict effort to recreate my original vehicle in a perfect condition, with the same paint scheme, wheels and even mud-flaps. This time perhaps I can have more fun. |
|
|
|
|
|
|
|
|
|
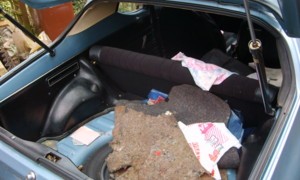
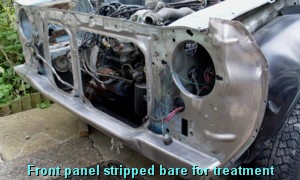
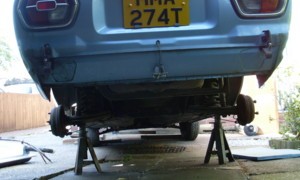
| 2011 The car is covered and stored under a shelter, but the front of the shelter is open to the elements so the first work was to strip the front panels and get rid of any surface rust, then paint the areas to prevent any further rust appearing whilst it sits there waiting further attention. This car does have some serious rust areas on the sills near the rear wheel arches, and in a few other areas, so I cannot dodge the bullet this time and will have to buy a MIG welder. Well its going to be something new to try. Bits were removed for use on the first car, such as the doors, but nothing is really missing as I have duplicates. |
 |
 |
 |
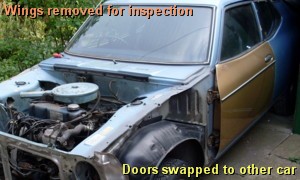
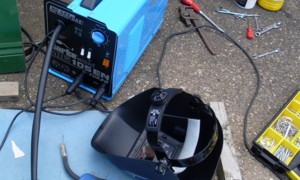
| May 2012 The weather is starting to warm up, and the days are getting longer, so time for work. I started by going on a spending spree and hit ebay for a number of items - including this time some alloy wheels. The wheels are classic Wolfrace slot style with a deep recessed dish, which makes them a bit big for the car but what-the-hell I like them. It didn't help that the tyres were large too, but they have been removed and I will get smaller ones when the wheels have been refurbed. That will make them fit better, but they will still stick out the sides of the vehicle a bit so I'll have to add arches to the car. My biggest expense was the MIG welder.
After a trip to Machine Mart and a chat to the helpful
salesman, then reading a few articles on the internet,
and carefully examining the various versions for sale in
the catalogue - I decided to buy a BLUE one! |
 |
 |
 |
| I decided that my first task this year would be to
sort out the major problem of the rust holes in the sills
and a few other places. The biggest problem areas were on
both sides just in front of the rear wheel arches. The
left side was the worst as the exterior section was gone.
The right side just had a series of small'ish holes but
both had lost the section just inside the arch, so I
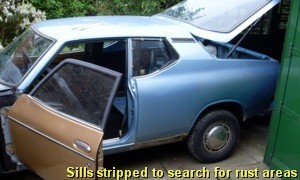
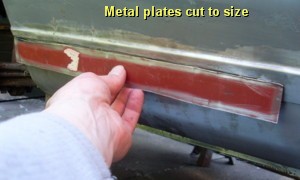
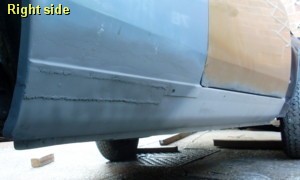
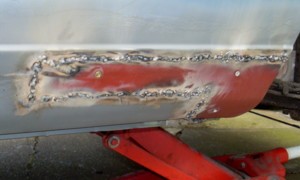
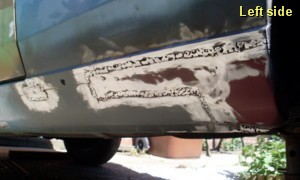
would have to fabricate the shapes. I figured that I could easily weld plates over the holes but was slightly concerned at my ability to shape metal, especially on the missing section on the left side. However I had bought some replacement sills in the past and so I could simply cut the correctly shaped section from one of those, and then weld it into place (above right). All the pieces were first cut from cardboard and adjusted to fit, then these were used as templates to cut the metal versions. They do sell various sized clamps to hold the metals together but I just drilled and screwed my new pieces into place for welding, then the screws were removed and the holes welded in. The secret of good welding actually appears to be an 'angle-grinder' with a sanding flap-disc, because you can clean off most of the mess that you have made to get a half decent looking finish. Of course you also have to weld the plates again to do the bits you missed the first time! I used paint-stripper on the sills to get them all down to bare metal, this way I could check them over for rust, but apart from the areas already spotted the rest seemed clean and sound. Most of the car is surprisingly free from rust, except for just a couple of specific areas which are easily treatable. |
 |
 |
 |
 |
 |
 |
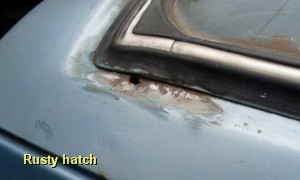
| I had hoped that the rear hatch could be repaired
with a bit of welding,but after doing some clean-up work
on it I found a large amount of rust under the rubber
seal, so it will be replaced by the one I took off my
first car. That also has a few rust holes, but not so
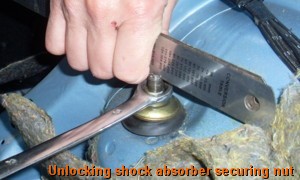
many, and the metal is good around the window seal. Getting
the rear shock absorbers off proved a problem once more
and I had forgotten how I did it on the last car. It
should be easy as there is a single nut on a thread, with
a slot on top for a screwdriver to unscrew it, but the
nut is locked fast and the metal distorts when you try to
unscrew it - damm! In the end I remembered to heat the
thread with a mini-blowtorch, jam two metal rulers in the
slot and brace the ends against the bodywork, and then
hit the spanner with short sharp blows from a lump
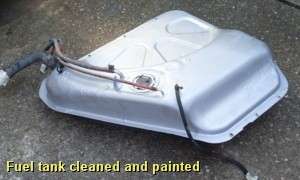
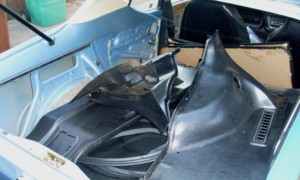
hammer. June 2012 With the major welding now completed I cleaned the inside of the wheel wells and the underneath of the car around the rear end. All surface rust was sanded off and bare metal painted, then two coats of underseal applied. The fuel tank could then be reattached, which was good news because it gets it out of my kitchen and I can finally put the exhaust pipe back on and restart the car. This had been spurring me on because the car had been standing for about nine months and I was starting to worry about the engine working properly, but as it turned out there was not a problem as the engine coughed back to life, and after 2 minutes of spluttering, ran just fine. My big decision is now also sorted about what colour to paint the car. I have given it a lot of thought and did rather favour Yellow for quite a while, also having it an Orangy-Red, or even Black. But its just going to be yet another Blue, because Blue is just 'my colour'. .........to be continued |
Photographs, text, and car rebuild by David Sisson