|
Project - Datsun 120A F11 Coupe ...... Part 3
Timewarping
back to the 1980s as I try to recreate my first car
Back to Page 1 .. or... to Page 2 ...or... Back to INDEX
|
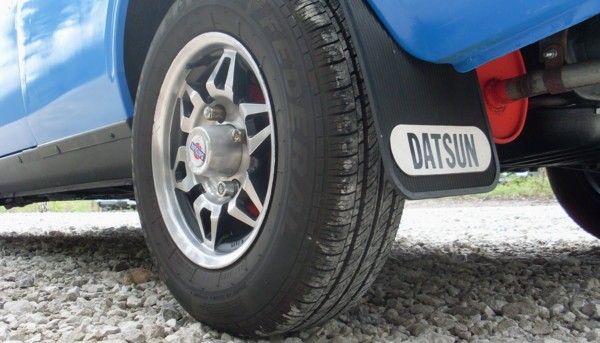
| The old tyres were useless, but I would not have
wanted to use them anyway as I wanted a new 'set' for my
smart wheels - besides I'm the sort of nit-picking person
who hates seeing different tyres on cars, with each wheel
having a different tread pattern, so I had to have five
the same. This was a slight problem as the first garage I
went too asked me if they were for a trailer! Seems
12" tyres are rare these days so I ordered some on
the internet, from a company called Camskill, and they
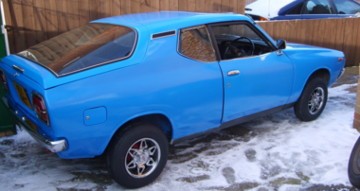
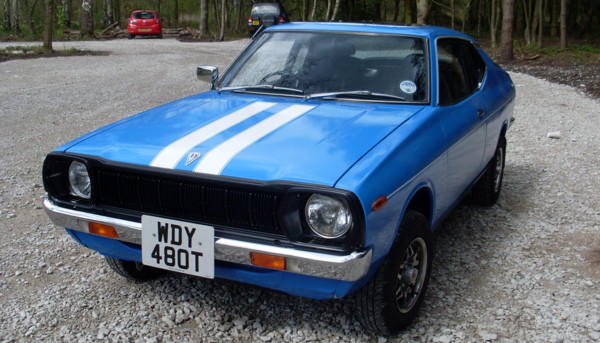
arrived two days later. So today I was able to finally refit the wheels - which in the freezing cold and snow was not too pleasant but I wasn't in the mood to wait anymore. I think it's fair to say that the car is now almost finished ....................... possibly. |
|
|
April 10th 2010
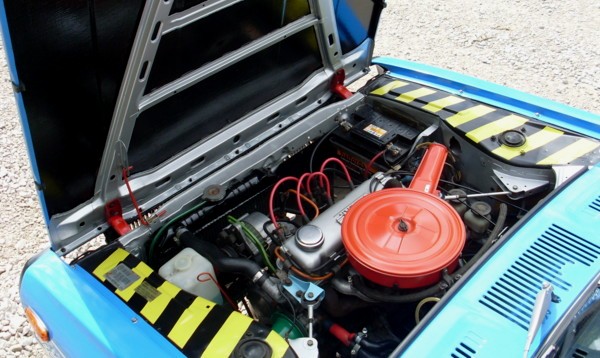
'Engine problems' The weather finally turned nice for a day so I got out my tools and headed for the garage to continue the restoration work. Generally speaking most of the tasks now seem to be done which is good thing - especially as I am now into the 3rd year of work and wanting to see this project finished off and put to bed. I sprayed some black paint onto the sills and have decided for the moment to leave off the long chrome plastic trim strips, that run between the wheels arches, as they affect the look of the car, basically making it look taller and creating a line that will clash with the white trim-line I will be adding later higher up on the body. One remaining problem is the engine which continues to emit blue smoke. Although this has reduced considerably over time, with my attempts at servicing, it is still clearly there and really bugging me. One option is to take the top of the engine off and have a look round to see if there is an obvious problem - faulty/worn piston rings are most commonly mentioned by other people. However my skills at working on engines are untried and I fear that it wouldn't actually work properly afterwards! So I think it will be far easier to simply pull this engine out and drop in the spare that I took from red Datsun 3, which when fired up ran far better and smoother than the engines in the two cars I have. So I decided to have a good look at the spare engine and managed to clean it up rather well by covering it with heavy duty engine degreaser and scrubbing it hard - although most of the dirt on the engine did seem to just transfer over to my clothes! Lots of water then removed all the mess and left me with a very clean looking item - during the process the gearbox overflow vent and speedo connector were covered in tape, the carburettor was covered in a plastic bag and the distributor cap was replaced with an old reject cap to protect against the water. One benefit of this option is that I will have an empty engine bay for a period where I can then clean it and paint it up. I have done some work tidying it up over the years but the bulk of the engine has usually stopped me getting to many parts and so it still shows a lot of the original dirty gold paint - which looks a bit rubbish - so I now want it all bright and silver looking. April 14th 2010 April 17th 2010 April 20th 2010 April 23rd 2010 Started reconnecting the various pipes and decided to
change the oil filter while I had such good access to it.
Good job too as it was completely jammed onto the engine.
After nearly pulling the skin off my hand I decided to
use the classic remedy of punching a screwdriver through
the side of the filter - in fact it was so fixed in place
that I had to doubled up and punch another one through it
at a right-angle and then used both to try and twist it
off. At one stage I thought I was going to burst a blood
vessel in my head but suddenly it came off - Phew! April 28th 2010 Checked the windscreen wipers and got them to operate, but the washer fluid won't spray - another problem to fix. May 4th 2010 The car is almost finished so getting down to the last few jobs on my list. One was to remove the rear springs and check them out so I jacked up the car and started dismantling bits. The springs were rusty but it was minor stuff so cleaned them up and painted them a nice yellow colour. The rubber seats were checked for wear and cleaned up well, sprayed and soaked in a rubber restorative they looked pretty smart after a few hours. The rear trailing arms were cleaned up too and painted as was the brake pipes. Next and probably the last real job on the list to do
was remove the petrol tank. |
| May 14th 2010 'More engine problems' I don't believe it!! The bloody engines faulty. Arrrrrrrrrr!!!!!!! I was planning to try and finish the car this weekend, as there are only 'little' tidying up jobs left to do. But as I stood looking at my handiwork I noticed a bit of steam wafting up from the engine bay. Then as I looked closely I could see a small bit of water of the side of the engine - which I traced to the cylinderhead gasket! Yes the gasket had obviously blown a while ago, that's the big problem with buying other peoples old cars you just don't know the history. This car is really starting to annoy me now - in my mind I was close to finishing it, now I have a BIG job in front of me. Bugger me, will this never be done. May 17th
2010 Stage one was to disconnect lots of parts, cables, pipes, securing brackets, alternator, exhaust pipe, drain the water etc. Then remove the air filter and the carburettor - which came off rather easily actually. I decided to leave the rocker assembly in place and just unscrew the 10 engine bolts and remove the head in one piece - one benefit being that the valve springs under tension lift the head and break the gasket seal for you. With the head removed you are then faced with looking
at the tops of each piston in their cylinders - feels
like open-heart surgery! With everything cleaned up it was a simple case of smearing blue sealant on the engine block and fitting the new gasket. Then more sealant on the cylinderhead and dropping it into place with the pushrods in the correct position. tighten up the engine bolts and refit everything. Job done, rather simple in the end - but boy does my back hurt from leaning over the engine bay, I think I'm crippled! May 18th 2010 Drove the car up and
down the driveway - engine is purring - sometimes I
impress even myself! May 21st 2010 'Yet more engine
problems' As I had already taken the engine apart once I felt as if I partially knew what I was doing and maybe this time I could try something more involved. Reading the Haynes manual it talked of removing the valves and cleaning all the parts, which clearly needed doing due to a heavy build up of carbon all over the valves. A 'Valve Spring Compressor' was mentioned as the tool required for the job and so I looked on ebay to see what one looked like, then visited my Dad's old garage to search for it as I knew that he had done this job 30 years ago! Luckily it was still there lying in a draw - I'd probably seen it a few times over the years but never recognised what it actually was for. |
 |
|
Stripping down the cylinderhead was pretty easy with
this tool; I just needed eight small boxes to put all the
valve parts in, as you need to keep everything
together,and in order, so that they can be reassembled
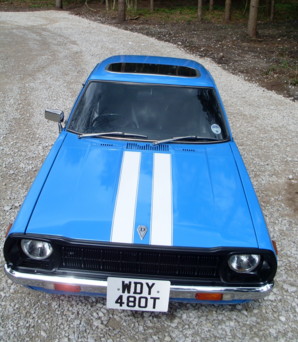
again properly. I'd bought myself a grinding kit a while ago (because it was really cheap) but had hoped not to use it - this was one of those jobs that I hadn't intended to do as dismantling engines wasn't in my plans. Still once you start it isn't too bad. For those who haven't done it valve grinding is simply cleaning the edges of the valves to allow them to fit perfectly in their seats. The kit comprises of a length of tube with a rubber sucker on the end and some grinding pastes. Simply stick a valve on the end of the sucker, smear some paste around the edge, stick the valve in it's seat and then spin the tool between your palms. Pretty easy. The biggest job is just cleaning everything and I filled the rubbish bin up with cleaning rags and paper towels and got pretty filthy in the process. Also you have to carefully scrape off all the built up carbon deposits that have become stuck to the parts over the years without damaging the metal. Again the previous headgasket had to be scrapped from the engine block - it was only on for a couple of days but it falls apart and can't be reused. The hoover came in handy again for sucking up all the debris. More turps and paper towels cleaned the parts and a new gasket was applied - with more blue sealant - and then the new replacement de-coked head was fitted. I tightened the bolts to the specified torque - and then a little bit more for safety - if this leaked again I would probably pack in the restoration and lock the bloody car away for a few years! In fact I was so scared of further failure that I walked away and left the engine for a day before I dared to start it - and then I only ran it for a minute before switching off and letting it cool down - while I sat there waiting and half-expecting something to explode! I followed this with several other small runs over the next few days and nothing bad happened - so I finally dared to believe that it was all OK and was in fact actually going to work properly from now on. Phew! May 28th 2010 Onto the final jobs, mostly bits of paint but also check out the brakes. First job was to take off the rear wheels and adjust the rear brake settings. The handbrake was a bit slack so I decided to tighten it up and while I was at it I changed the brake cable too. I have been thinking about painting white lines onto the car for a while, and changed my mind several times, and so I've been using the paint program on my computer to simulate a variety of designs on pictures of my car - however as I have a spare bonnet I decided to move on and experiment for real and painted a couple of white lines on it. I quite like the result so will consider this for the final scheme. June 20th 2010 Spent the last few weeks doing minor little jobs, touching up paint and checking that everything was working right. Found out that the washer bottle motor was ruined and useless so I had to fit a separate motor - luckily this had already happened to the spare car so I could just disconnect that and use it. I also painted the White lines onto the bonnet and added the White trim-line to the sides of the car. This caused an unexpected problem as I ran out of White tape at one point and then couldn't find a shop that sold it, seems that it's not popular these days and some shop workers just looked at me as if I was speaking nonsense when I asked for it. The guy in Halfords offered me electrical insulation tape! June 26th 2010 'Success' Finally the day I have been waiting for - MOT day - and I'm happy to say that the car sailed through the test with the only problem being that the headlights were not inline - but I expected that and it was quickly sorted out. My biggest worry was that it might start raining on the day because I'm trying to never let the car get wet again - which is rather difficult in England! I've spent some much time and effort trying to get rid of all the tiny, and not so tiny, bits of rust that it seems the best idea for the future is to simply keep the car dry. So hopefully the windscreen wipers and washer bottle will only ever need to be used on MOT day when the guy tests them. |
|
|
| YouTube . video . now . available - - - SEE LINK HERE |
*Always nice to
hear from other Datsun 120A F11 owners, please send me a picture
of your car if you have one to hand
*As of 2024 this car remains in working condition, although I
have not had much time to drive it recently
Back to INDEX .... Dat.......................... Contact me HERE
Photographs, text, and car rebuild by David Sisson