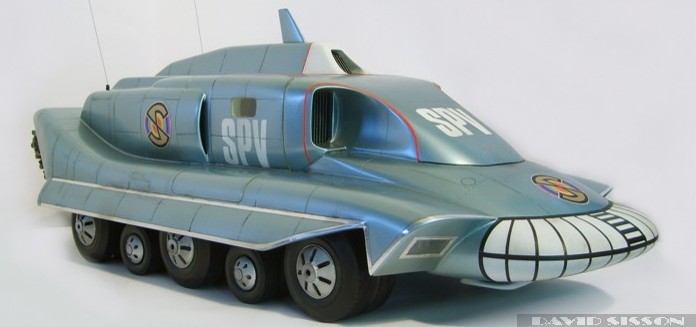
Wheels are
often a problem area on models, especially on
something like the SPV which has twenty of the
things and in two different sizes to boot. I had
been looking for usable wheels for years but with
no success. I did come across wheels and tyres
with the right type of diameters but they were
either the wrong shape, the wrong thickness or
had totally different tread patterns. The tyres
on the SPV model had a rather square cross
sectional shape, and a distinctive tread on the
big wheel, so scratchbuilding a copy was the only
way to go.
For the big
wheel I started with a casting of one of the old
RC aeroplane tyres I had used on my SPC model.
This gave me the correct general size and
sidewall shape, I just had to add a square rim
and tread pattern using filler and strips of
plastic sheeting. For the small wheel I found a
lorry kit with nearly correct tyres, but these
were too thin so I had to cut two apart and join
them together. As they were only made of thin
rubber I filled them up with car filler first.
Silicone rubber
moulds were made of these two masters and then
used to cast the twenty wheels. The castings were
cleaned up and paired off, and then to save
weight the inner wheel was hollowed out.
A simple plastic support frame was made to ensure
the wheels matched up squarely.
The chassis was
constructed from 4mm Perspex and Plasticard, with
timber battens placed inside for the base-plate
to screw into. This plate was detailed with
plastic kit parts, but as the original was
actually smooth I kept it minimal. The big wheels
were paired off onto simple steel axles. However
the centres of the small ones are below the
chassis base and a straight axle would have
ruined the look of the model from low angles. So
I bolted the wheels to trailing arms, that I
soldered up from Brass, and they just hang loose.
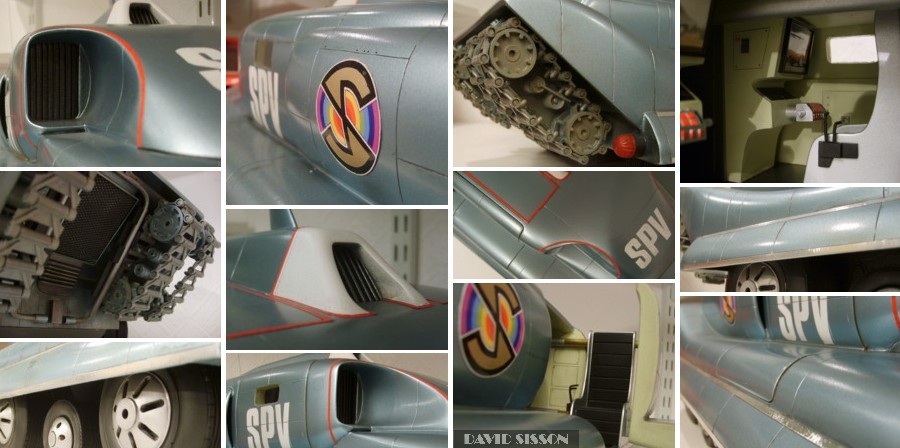
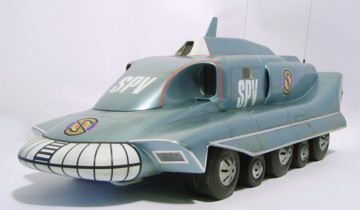
The distinctive
hubcaps were a slight problem in that they appear
to be machined in aluminium and shine quite a lot
in some publicity pictures. As I don't have the
facility to make metal parts I was thinking of
asking someone to do these for me.
However looking at normal episodes of the show
and 'in action' publicity photos the bright
chrome hubcaps are almost always dulled and
dirtied down by the effects guys. This is
probably because a model with such wheels does
actually have the tendency to look more toy-like.
As a result I think I actually prefer dirty
silver wheels myself and so I just made up some
resin castings, from plastic masters, and painted
them.
I'm really not
sure what these hook things are supposed to be,
just that there are two of them under the front
bonnet - or there are to begin with. I think ones
fallen off in the episode 'Avalanche' and the
other goes missing soon after!
I made mine from two layers of 2mm Plasticard. I
find that in these cases its easier to just cut
the shape into one layer then glue this to a
blank second sheet, which can then be trimmed to
match when the glues properly set.
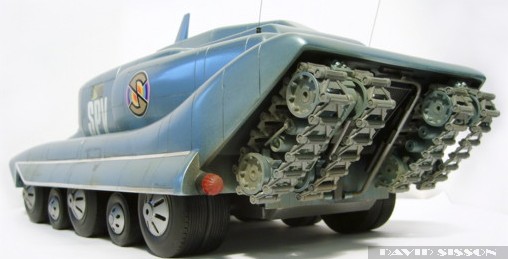
The rear panel
was now detailed. Thanks to the Dinky toy we know
that the rear tracks are supposed to pivot down
and give extra traction in rough conditions (not
have the SPV travel up a hill in a vertical
position as per the TV21 annual!). However this
is a feature that was never used in the series
even though there are times in several episodes
where it would have come in handy - you would
therefore have to assume it didn't work and
couldn't be filmed. From the start I had no
intention of making this a working feature, as we
have no idea of what the detail behind the tracks
looks like and I don't really like inventing
parts on a replica.
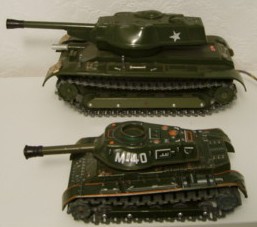
The first job
was to remove the wheels and tracks from the M-40
tank, one tank will give you the tracks but you
need wheels from two toys to do the job. I was in
the process of casting some extra wheels but, as
I was only making the one model, I decided to
take the easy option and just buy two toys.
Most of the
detailing on the back was fabricated from
Plasticard with the large central loop made from
Brass. From the looks of it this simple loop
feature is the pivoting support for the two track
sections but it actually goes missing in later
episodes. Many of the details on this rear panel
are from Scalextric trackside accessories kits,
such as carjacks, toolbox's and oil cans.
The rear lights
are the same as those that appear on the
Explosives truck, I cast these two up using red
tinted resin. The front headlight bulbs are real
but not wired up.
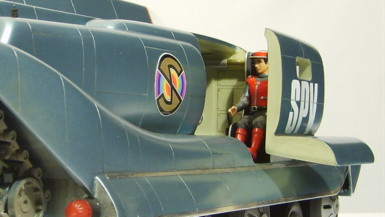
Generally
speaking, in television and film, you will find
that the internal sets and special effect models
do not physically match up properly - if at all!
The SPV is not too bad in this regard but there
are two problems. First there is not as much room
inside as the puppet set would have you believe
and secondly the side door would actually have to
extend two or three times further than seen on
screen in order to clear the wheel housings. Even
with these problems people (and myself) still
expect to see internal detail so you just have to
try and fit it all in.
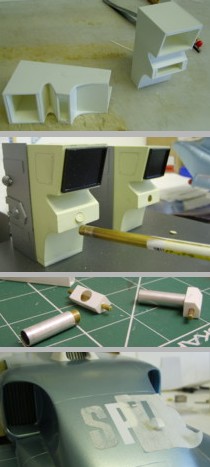
The first job
was to line the inside area with plastic sheeting
and create the main bulkhead which goes behind
the two seats. Then the twin telescopic arms,
that support the door, were soldered to brackets
and drilled so that they could be screwed fixed.
The door was then temporarily taped into place,
the parts lined up and positions marked. Then the
frame was glued and screwed to the door and
finally fixed to the bulkhead, with bolts
allowing for its later removal if necessary. On
previous SPV's I've tried doing all this
invisibly with dubious results, this time I went
for strength and reliability and so didn't care
if you can see the odd screw head.
The seats and
control panels were fabricated in Plasticard,
with the control units being glued to the floor
plate that is part of the chassis. Photographs
were used for detailing the view screens and
instrument panels.
White SPV
lettering was spray painted on using masking tape
templates. A great deal of care had to be spent
here as it really is a one-shot deal and you want
them to go on straight. The central letter was
done first and then the surrounding two matched
up to it.
Note, the inside
edges of the upper white intake round off as they
merge with the roof, a detail that most if not
all replicas and toys seem to miss and yet it's a
very obvious detail. A less obvious detail is
that the front angled facing is slightly concave,
bowing inwards gently along it's short length.
This again always seems to get missed but gives
the original SPV a distinctive look.
Spectrum
roundel's were scans of the original decal,
cleaned up and adjusted slightly on the computer,
and then just printed out on thin photo paper.
The one on the bonnet was made thinner by
removing part of the backing paper but I decided
not to bother on the side ones as its not that
noticeable. Finally the gold centres had to be
masked off and sprayed with motorcar acrylic
paint.
Silver strips
were cut from adhesive foil. I found that they
tended to blend in to the surrounding paintwork
so I ran a black biro down the edges to make them
stand out more. The Letraset tapes were the final
bits to be applied. I tend to just buy a
reasonably wide tape and then cut it down to the
widths that I need, otherwise you end up with
lots of different (and expensive) tapes that
don't get used for years and then dry out.
Before anyone
asks, there are of course two small cylindrical
'thingies' hanging down at the back in the
well-known profile photos, they are Scalextric
oil cans and funnels but as they do not appear on
the model during any of the episodes I have so
far not added them to mine.
|