![]()
Restoring the Overlander Studio Model from Gerry Anderson & Christopher Burr's Terrahawks
|
|||
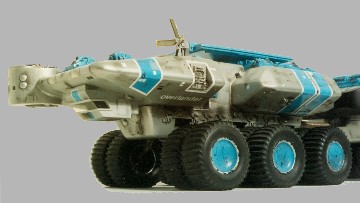
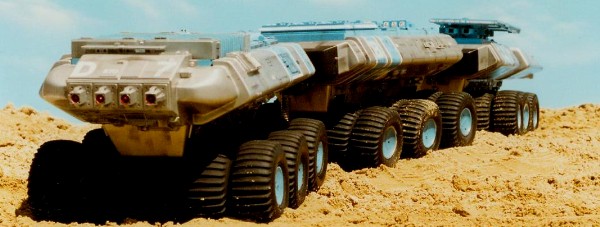
The reason for this was the appearance of the mammoth multi-wheeled model called the Overlander, the Terrahawks primary supply vehicle. This striking design, by the new SFX director Steven Begg, brought back the feelings I had when watching 'Thunderbirds' during my childhood and became an instant favourite. After its outing in this episode (Close Call) it was to reappear in two more full episodes (Thunderpath & Zero's Finest Hour) and also in the usual Gerry Anderson compilation episode, where he liked to save money by repeating some exciting bits from previous episodes. |
|||
 |
|||
|
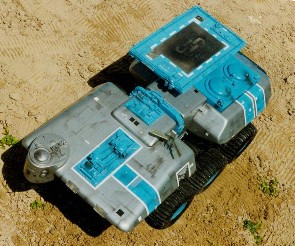
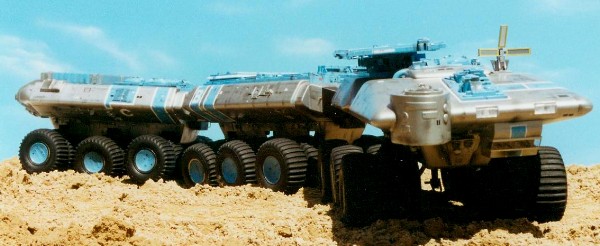
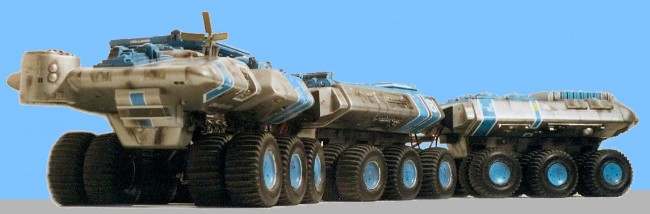
*The three-bodied five foot long model is carved from wood and detailed with numerous model kit parts; the front section was built by John Lee whilst the two trailers were built by Steven Woodcock. The nine very heavy brass axles were constructed by Pete Bohanna and then outfitted with 36, old style, rubber balloon tyres from a Tamiya radio-controlled toy. |
|
The Restoration ...............by David Sisson After many years of trying to build replica models that looked like the studio versions it was very nice to actually own an original - unfortunately the only reason I got hold of it was because the model was in a pretty poor state - if not completely knackered! The first problem was that a good number of parts were missing, major parts including the lower hull areas around the axles, the radar, most of the drivers cabin and all the hubcaps. The second major problem was that all the hundreds of original drawn on panel lines had now been cut into the surface of the model, exposing the wood beneath and causing parts of the surface to break up and fall away. Several areas also had long deep splits in the wood. The third problem was
that the model had been resprayed rather badly whilst
still in a filthy condition, which not only obliterated
all the surface details but trapped in all the muck and
grease/oil (?) as a result some areas of paint had never
set and were actually dissolving the kit parts! The only option was to completely dismantle the model, clean off all the rotten paint and dirt, restore the wood surface and then replace all the missing parts as I rebuilt it. Easy! As most of the kit parts were attached to Perspex boxes, that were inserted into holes in the top of the model, these could be removed and worked on separately. One problem with the wheels was sorted out quite quickly. At first several of the wheels kept falling off their axles which themselves were badly aligned. It turned out that six wheel hubs were different from the rest and all the axles (which are alphabetically labelled) had been reattached in the wrong positions. This was simply fixed by working out which wheel went with which axle and in which position. Photo
right; Front body has a metal rod extending out of the
bottom for the attachment of the guide/control wire. The wooden bodies were stripped of their kit part detailing and sanded lightly with wet & dry paper, to clean off the top layers of paint and reveal the original surface detailing which could then be photographed for later use. My initial idea was to fix all the cracks, splits and cut in panel lines with epoxy filler but that would be a very long process and really what the wood needed was a completely new skin. I decided to cover the wooden bodies in a thin coating of my old favourite SP113 epoxy resin. This filled most of the panel lines in one go and I only needed to use filler on the deepest cracks and holes. |
|
 |
| Steven Woodcock,
Terrahawks model department - 'When we made the Overlander - in fact when we made any model that was carved from wood - after carving, and before artworking and final detailing, we used to spray them with a substance called Lesanol. This was like the car filler-primer that you can buy in spray cans and was exactly that - a grey spray filler primer. But it was thicker and came in a one-litre can and was applied by spray gun. If I remember correctly, you mixed a clear setting agent into the filler and this enabled the consistency to be varied for spraying. Pete Bohanna introduced it to us because he used to be a boat builder. It was a quick way of getting models ready to finish and was very easy to sand. As you know, filling wood grain and getting it smooth can be quite time consuming. I remember when I first did it in my teens and it took forever. But Lesanol settled evenly and helped to smooth out the surface and didn't need much sanding when it had dried. You didn't even need to get the surface of the woodgrain glass smooth before spraying because the Lesanol evened it out. It was one of the things that worked in our favour because of the tremendous speed with which we had to work'. |
 |
|
To give the model a new skin every removable item had to be prised off and more photos taken to ensure that I could put it all back together in the right place. Luckily with the clear resin coating I could glue the kit parts back exactly but with the panel lines I wasn't so sure as the model would have fresh paint covering them. As it happens the very bottom of the model is covered by the axle surrounds so is unpainted, while there is an opening in the top of each hull which meant that I could leave marks in both these places to redrawn all the vertical line perfectly - so only about 50% had to be done from photo reference. The new resin coating was sanded smooth with wet & dry paper mounted on a block to ensure a flat surface finish. After painting with cellulose car spray paints (Ford Olympic Blue & Silver Fox) I could begin the long task of redrawing the hundreds of panel lines in black biro. Most of the effort was
now spent on carefully trying to clean the Perspex
kit-bashed boxes. The one from the rear body was the
worst with most of the kit parts either having dissolved
or being so brittle that they fell apart when touched. The model also featured a number of EMA parts that had withstood the chemical attack. However many of these had either been broken or they had taken the easy option of falling off over the preceding years. Replacements were ordered from the EMA Catalogue. One area that had to be rebuilt almost completely was the lower hull around the axles. These parts had been vac-formed in thin plastic and had all fallen off except for the front one which was still held on by the electrical wiring. As this moulding was very flimsy I decided to make the replacements out of something stronger. So I just used this part as a mould, waxing the inside and applying a mixture of P38 and resin to produce a set of parts for all three bodies. Unfortunately I didn't have an example of one of the hubcaps, but as a simple design it wasn't too much trouble to heat-form a set out of 0.75mm Plasticard. Right; As the rear panel and one side of the drivers cabin was still attached to the model I was able to easily recreate the missing parts, although here I went further and added a detailed cabin matched to the first episode and even added one of Zelda's cubes. (not visible) My biggest worry on this project were the tyres as to my knowledge they were no longer available. Luckily all 36 were on the hubs but their condition was not good. When I first got them they had been spattered with chemicals and paints and the sidewalls were badly cracking. After gently cleaning them they were soaked in a rubber protecting solution, then each pair were turned around so that the bad sides are facing and supporting each other - and so no longer visible. Left; rear unit being rebuilt - Right; rear unit finished. |
|
|
 |
* This model is now in the hands of a private collector in Canada.