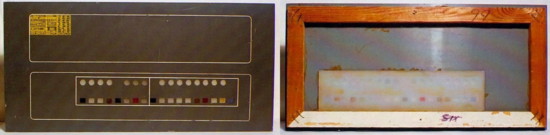
The panels
were made from 4mm Perspex. Each one was placed
over a simple plan and then the light pattern
could be marked out by placing pre-cut pieces of
masking tape into position. (For the circular ones I
had a collection of self-adhesive paper screw
head covers) The panels were then spray painted with
white car primer and the white lines could then
be marked in position using thin strips of
masking tape. Finally the panels were sprayed
with the topcoat of Hurricane Grey paint - with
the last coat dusted on for a satin finish. All
of the masking tapes were then removed and the
'lights' could be given colour by attaching
pieces of translucent plastic to the rear side.
At first I thought I was going to have to buy
some expensive tinted filters but ended up
cutting up cheap multi-coloured plastic wallets
from a stationary store. Industrial strength tape
was used for fixing the parts quickly although
the two wooden positioning blocks and metal
plates had to be super-glued.
To support all
these panels I assembled a frame on the wall
using 3-inch thick timber. A series of magnetic
catches were glued to the frame, the first of
several hundred used on this project, as I wanted
the panels to be easily detachable and not have
lots of visible screw heads.
As all computers
have to have flashing lights then a bit of wiring
was required. Several sets of decent Christmas
tree lights were bought and set up behind the
panels. In order to get them bright enough many
of the lights had to be paired off and tin foil
was used to reflect light and stop light spill
into other areas. Also even though the final two
sets of lights were flickering behind small holes
you could still see that there were two separate
and distinct groupings, so a few bulbs had to be
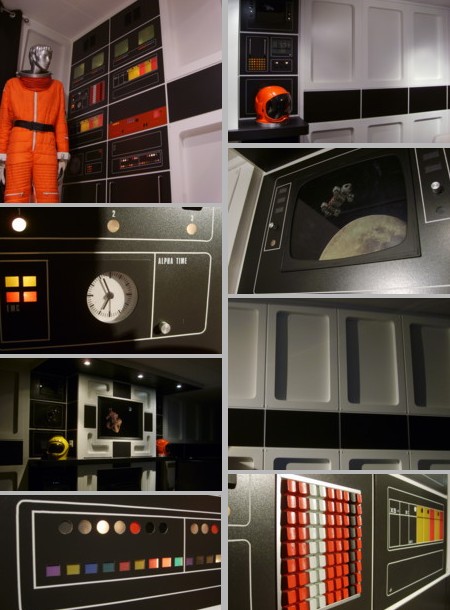
intermingled to kill the effect. I was very happy
with the first version of my 'Computer', but I
finally decided to slim it down to two columns
for design reasons. All these panels are magnetic
so can be removed/changed easily and give access
to the lights. The blank panels are 4mm MDF with
metal vents from a DIY store. I was going to buy
the metal handles from the same store but Ikea
sell them much cheaper. A computer keyboard was
broken up, the keys spray painted and hot-glued
to a plastic sheet backing, to create the replica
centre panel - as seen in the episode 'Ring
Around The Moon.'
With the computer
now considered to be a success I decided to push
on with the project and do the adjoining
fireplace next. Again the basic frame is blocked
out using a decent thick timber, as it needed to
be strong and I didn't want it to start warping
after a few months. All screw heads that would be
visible were counter-sunk and the holes filled
and sanded smooth. I decided to continue the
black panel effect on the overhang roof section
and the centre mantelpiece, although here I used
standard household emulsion paint.
I was stuck for an
idea for the centre-piece but in the end decided
on a painting/picture, that harked back to the
'viewscreen' look from the series, surrounded by
some recessed panels.
Recessed panel
sections took a bit of effort to construct as I
wanted them to have around one to two inches of
depth, which meant that I couldn't just cut the
shape out of one layer of material and then
simply slap a backing panel on. Firstly I had to
cut out the shape of the panel from 4mm MDF, then
draw in the shape of the centre recess and remove
it. Lengths of hardwood were then glued and
nailed to the back to give me the depth. In order
to get a smooth consistant paint finish this
hardwood also had to be covered in thin MDF so a
gap was left between the wood and the inner lip.
Here the covering strips of MDF were glued to the
inner edge of the hardwood and were held in
position with masking tape. At this stage gaps
are left in the corners to allow the panel to
remain perfectly flat.
I decided to coat
the MDF in Sanding Sealer to give a better
surface for the filler and later paint finish -
but I'm not sure if it was really necessary.
The curved corners
were made quite easily by applying car filler to
the area, then placing a length of thin
Plasticard on top and holding it in the correct
shape for a minute whilst the filler set. Here I
ended up using a plastic cap from a paint tin to
provide the correct shape. After the filler had
set I removed the plastic pieces and trimmed off
any surplus material. The filler was then sanded
down until it was nice and smooth and blended
into the surrounding wood. The heads of the panel
pins, that secured the hardwood, were punched
beneath the surface of the MDF and the small
holes filled in.
*All the MDF panels were
painted using standard household emulsion, in
this case white vinyl silk, but the trick is to
apply it using a Gloss roller, which speckles the
surface, creating a professional quality looking
textured finish.
Of course the
original studio Alpha panels were actually an
off-white colour but I didn't want that.
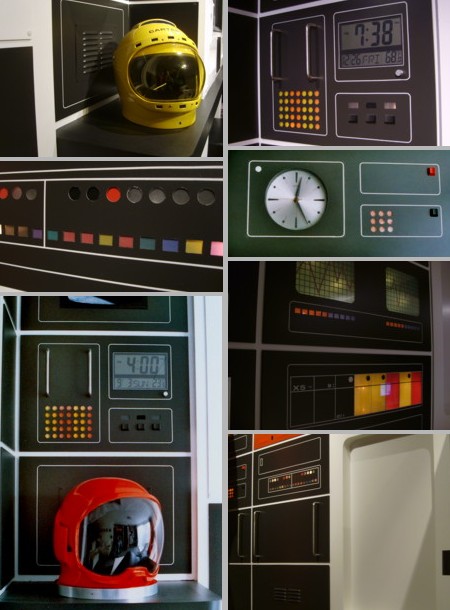
A picture frame
was modified to fit in the centre of the wall,
again it can be easily removed and changed. The
surrounding black panels include more lights and
a digital clock, this was a cheap plastic model
that was partially cut up to enable it to fit
into place. There's actually very little
difference between the black emulsion and the
Hurricane Grey car paint, so the room just
appears to be black and white.
I spent a great
deal of time making sure that the effects lights
were working and appearing brightly enough but I
didn't realise that they were also showing
through parts of the panels where the thin white
lines were! So I had to paint the rear of some
panels black or just use black electrical tape to
stop the problem.
With the chimney
area done it was on to the final stage of
covering the rest of the wall in recessed panels.
Each panel was 22" x 34" and made just
like the smaller corner pieces. Only the outer
edge has to be constructed as the flat centre
area is just a standard sheet of 3mm white
plastic-coated MDF.
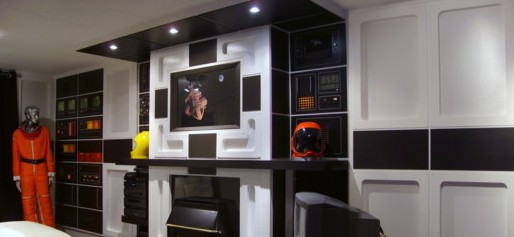
The original plan
was to include shelves in the design, for books
and CD's, but I found that any modern day items
that stood out ruined the look of the wall.
Although there is a Hi-Fi unit, gas fire and
television in the mix these items are black and
fit in reasonably well.
Note - all the
panels end 6 inches above the floor and a
semi-recessed blank wood sheet covers the gap and
all the various wires and more importantly means
I don't end up kicking and damaging the panels..
Right; A finished corner piece. All the
recessed panels needed to be screw fixed which
required the use of the plastic caps.
After the wall
construction was finished I decided that the
design didn't look 'balanced', one side of the
room was too dark so the computer had to be
slimmed down to just two columns, instead of
three, and a couple more recessed white panels
were fitted. This meant that I had to change all
the electrical wiring so it caused me quite a bit
of trouble to do.
Next problem was
that my blue patterned carpet looked completely
out of place. So the carpet was thrown out and
plain grey office-style (and pleasantly cheap)
carpeting replaced it. The next problem my
multi-coloured sofa looked wrong! So out the door
with that and a white leather not-so-cheap corner
unit replaced it. I also ended up buying a swivel
chair from Ikea called 'Luna' which seemed apt.
I also then
noticed that colour was starting to become a
problem and I've had to become rather ruthless in
removing it from the room. My dark blue curtains
just didn't look right and also had to be thrown
out and replaced with black. No matter how good
something is, if it isn't black or white then it
probably has to go. Even some of the small
colours in the computer sections had to be toned
down or removed!
Finally I
finished, well just stopped actually as there's
still a couple of little bits to do and I suppose
another wall.......maybe later with that.
|