![]()
Scratchbuilding the Mark IX Hawk from Gerry Anderson's Space:1999
|
|||
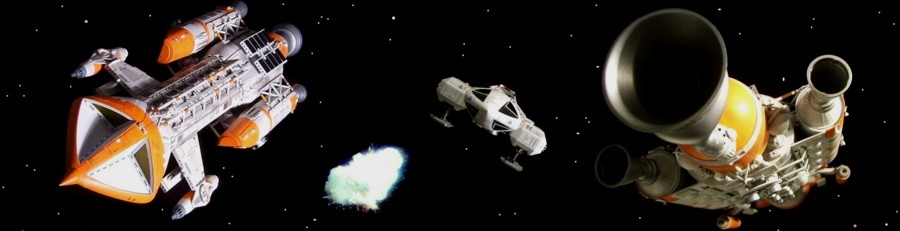
In these pre-Star Wars days this episode was a special effects extravaganza that certainly made an impact on myself and many other kids. This wasn't lost on the marketing men who brought out a model kit of the Hawk, as a companion piece to the popular Eagle Transporter, and as a result this craft is probably the most easily remembered 'guest' model in the series even though Space:1999 featured one of the highest model spaceship counts in television history. |
|||
 |
|||
 |
While I tend to spend most of my model making time producing replicas of the many principle vehicles from all the various Gerry Anderson TV shows and films, I do occasionally tackle a guest craft and I did have a go at building this one back in the late eighties. At the time I thought it was reasonably good but it wasn't really because I fell into the trap of thinking it was just made of a few Airfix kits. 'Hey its just a couple of Saturn rockets and a Harrier kit, EASY, have it finished by the weekend!' No, in fact it is made from a lot more and has three times more detail than I realised! After that failure I wasn't too keen to have another go because this model isn't actually one of my favourites, but I was given the rather impressive big original studio model by its owner who asked me to build him a copy before it was sold on. With the Hawk model set to disappear from the country it seemed like a good idea to build a copy for myself while I had the chance. The Hawk was designed by Special Effects Supervisor Brian Johnson and then built by Martin Bower, who not only had to build one high quality 31" hero model but a half scale version as well. In order to build the highly detailed models in such a short time frame Martin resorted to kit-bashing and as a result a great deal of the Hawk is made up of model kit parts. |
 |
The first task was
to try and identify as many kit parts as possible and
then try to find them. |
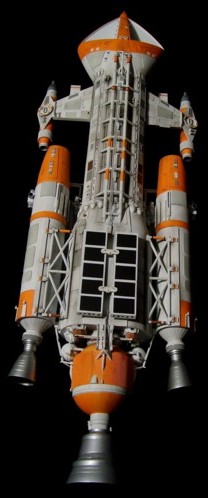
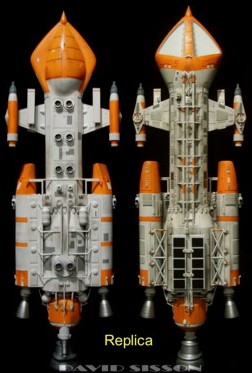
The Build ..................................... by David Sisson The first problem was that I needed four Airfix Saturn 1b's and these rare out-of-production kits fetch big money on ebay. Luckily a friend, Tony Groves, had an old kit that he had built about 30 years ago and he kindly donated it's remains towards this project. I decided then to glue the two hull halves together, make moulds and then cast up copies in car filler and fibreglass. The resulting castings were cleaned up and superglued to a central box-shaped Plasticard core. More plastic sheeting was then used to apply surface detailing. Here 1/2 inch plastic strips are glued to the angled sides with the top ones being with covered with a series of 10mm x 16mm rectangles. Having the original model on my workbench for a month meant that a great deal of the initial work could be carried out without the usual time consuming process of drawing plans or doing hundreds of calculations based on photographs. Progress was obviously very much faster than normal. I've heard a story that the side boosters were made by rolling and gluing plastic sheeting around cardboard kitchen roll tubes. I'm not sure if that's true but the dimensions actually matched my kitchen rolls and the original model certainly uses the rolled plastic sheet technique; which gives a different look to using perfectly round plastic tubes. |
|
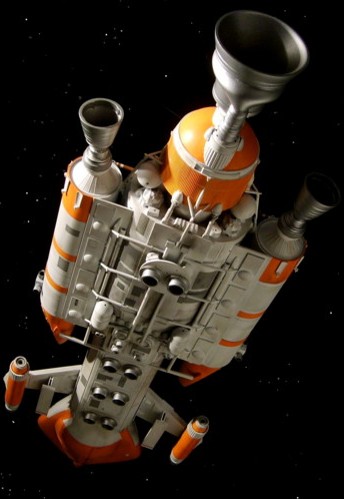
A steel tube was inserted down the centre of the model to help strengthen the rear engine assembly and provide a locating point in case I decided to fix the finished model to a display stand or to a support pole for taking photographs. Slightly pointless so far as the model hangs on fishing line and can usually just be laid onto black velvet for taking pictures. The rear bulkhead is quite busy with kit parts, I had to resort to making a rubber mould and casting duplicates. Left: I used 1/8th plastic tubing for the connecting frame detail. Although a lot of the model is quite a straightforward build of kit parts and plastic sheeting there are, as normal, a few problem areas including the nosecone and engine nozzles. The big main engine on the original model was made from part of a wedding cake stand, a Saturn V kit piece and part of a Caddymatic tea dispenser detailed with a fuel supply pipe formed in filler. Getting this part wrong
would ruin the look of the model but there was no easy
way of taking a mould off the original model. In the end
I managed to take two plaster moulds off either side of
the detailed rear piece of the engine bell. From these I
generated copies of both sides and assembled them on a
plastic base correcting any faults and filling holes
where the parts joined. The kit part was then glued to
this, its open end blanked off with plastic, and then a
rubber mould was taken; To help the rubber retain its
correct shape plaster of Paris was poured over the mould
to create a support jacket. The other nozzles were slightly easier to do as I managed to pull rubber moulds off the original model. The small vertical nozzles are actually plastic vents from a 1970's mattress, while the side boosters appear to be made from a plastic cap off a household item, as there are four locking bulges on the inner edge. Unfortunately I had a problem with the rubber mould for the side booster and the cast I got out of it was defective. With the original model now sold I had to repair this casting and use it to generate a new mould making the parts 2nd generation copies. Building a Hawk nosecone
from scratch would have been a long process so again I
decided to try and take moulds from the original.
Obviously I didn't want to damage the delicate model so I
carefully covered the nosecone in a layer of Kitchen
(tin) foil, then covered that in a backing layer of
plaster of Paris. From these crude moulds I generated almost solid
copies in car filler which I could then sand down to
match the originals shape, thus creating a set of master
patterns. As you can see from this picture the nosecone
is not very symmetrical. Fibreglass nosecones
were now cast up from plaster moulds. The window areas
were drilled out and the inset shapes created with 2mm
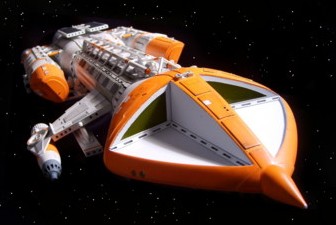
Plasticard and filler. The nosecone halves were superglued together then attached to the main body with screws and filler. On the original model there is a visible join line on either side disguised with a series of small plastic pieces. I decided to make the join a little less obvious and so it is mostly just a weathered line on my replicas. |
|
Whilst I had access
to the original model I had traced a number of the panels
outlines onto paper. These could now be cut out and used
as templates to cut new Plasticard panels. I had feared
that I might have to heat-form the panels on the top of
the cabin but as the plastic is quite thin I could just
use standard flat sheet. (The wooden box is something that I made at school 30+ years ago and is just about the only thing I ever managed to construct during all those handicraft lessons, as my teachers said that I had no ability to work with tools!! Perhaps we should have tried building spaceships instead!) The last tricky bit to make was the end caps for the two side boosters. Here I constructed a master from sheet plastic and cast up copies from a car filler/resin mix. I almost missed the Harrier part that goes on the ends as the piece is cut in half. The spine is only dressing on the Hawk and is just glued into place. Its basically two long 3/16ths inch diameter Brass pipes with 1/8th inch cross beams. The Solar panel was just made from layers of Plasticard. Apparently the original was a footpad from another model, which explains why it has so much detail on the underneath. |
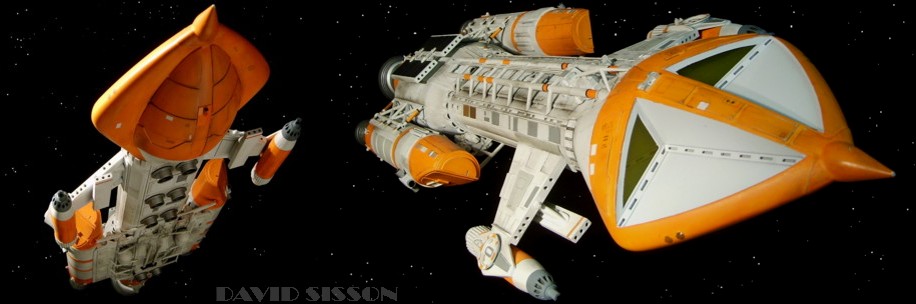
The big issue when
it comes to the Hawk is its colour scheme and I wasn't
sure which one I was going to use until the very end of
the build. As you may know (or possibly not) the Hawk was
originally delivered to the studio and filmed in a basic
white finish with black window surrounds. As this was
considered to be too 'Eagle-like' it was quickly given
new orange highlights and white window surrounds.
Sometime after filming the window surrounds were then
given a new black finish, making it the Hawks 3rd colour
scheme, and it has remained that way for the last 30+
years. |
|||
|
Back to INDEX ..... or ....... To Original Hawk model page .....
 |