![]()
Building Lady Penelopes FAB 1 from Gerry Anderson's Thunderbirds
|
|||
|
| *Please note that this model was rebuilt for a television commercial - see bottom of page - so is not all my own work.* |
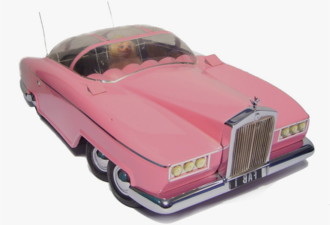
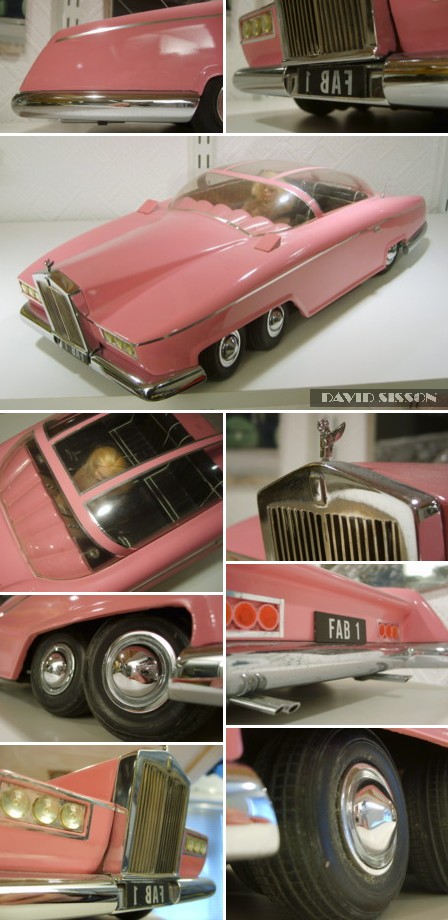
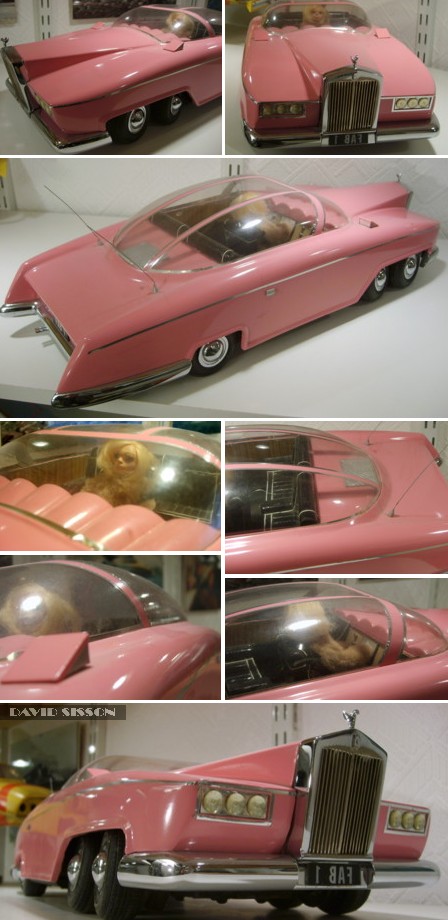
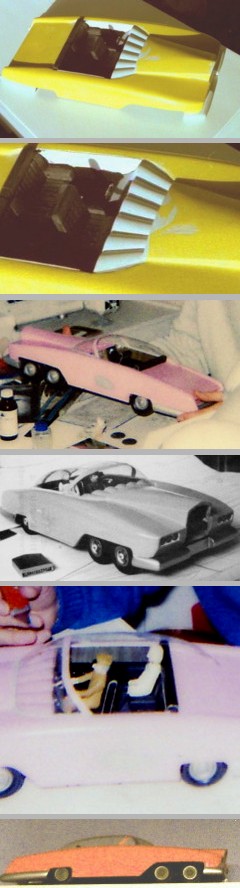
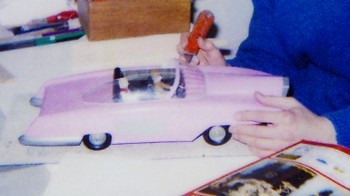
This project started in 1988 when I sat down to watch the feature film 'Thunderbirds Are Go' which contains a sequence where Lady Penelope, and her chauffeur Parker, pursue the dastardly Hood. What starts as a car chase quickly turns into a boat chase as FAB1 converts into a hydrofoil, cruises out to sea, and shoots down an attacking helicopter - somewhat far-fetched but rather enjoyable. Little did I know at the time but a couple of years later I would be watching my FAB 1 model on the very same television screen! The first problem was reference material, I collected all the various photos that I had from magazines and old comics but they were mostly taken from the same angles and were of limited help. Luckily Phil Rae came to the rescue with a complete set of profile photographs of both the puppet and model versions of the car. The two vehicles were different in detail and shape (as usual) so I decided to base my copy on the model car and drew up a blueprint. Size was the next question, with scratchbuilding you can normally pick your own size but with ground vehicles I was limited to the size of wheels that I could buy as I had no intention of trying to make each one of them. As it happened I had some old 2" diameter vinyl wheels, for use on radio-controlled aircraft, which were the right shape and had a reasonable tread pattern so my model would be 18-inches long. The Build ........... by David Sisson ............................... See also Science Fiction Modeller issue 10 June 1992 The next step was to form the basic body shape in balsa wood. This was done by cutting out the shape of the sides from 1/2" balsa sheet, two for each side as I needed an inch thickness for the rear half. These two sides were spaced out on the blueprint and then more 1/2" and 1/4" balsa sheets were used to connect them and create the boot and bonnet areas. It was now just a matter of sanding the wood to the correct shape with most of the effort going on the tapering rear wings and adjoining boot section. Then the soft wood was coated with epoxy resin to give it a strong smooth finish prior to taking plaster moulds - except that I never took moulds on this model I did something quite mad! As I had a number of models on the go at the same time, and all of them were going through this long process of mould making, I decided to try something different. I started by giving the wood several more coats of the resin to create a tougher but still thin resin layer, then turned over the model and cut/gouged out most of the soft balsa wood! This risky (insane) procedure left me with a very fragile resin shell that was in danger of falling apart in my hands. I then had to support this shell as I applied more fibreglass resin, matting and P38 filler to the inside to give me the finished strong bodyshell. |
|
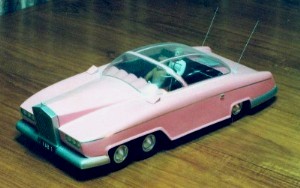
The interior of the car was now blocked out in 2mm Plasticard. The oddly shaped dashboard facing was cut from a piece of thin plastic with the fluted top formed in Milliput epoxy putty. The rest of the dashboard was scratchbuilt in Plasticard with some kit parts used for instruments and the steering wheel. Next the seats were carved from balsa wood blocks with more thin strips of balsa to simulate the padding. These were coated with sanding sealer and painted with several coats of black gloss enamel with strips of adhesive tape used for the white trim. Most of the rest of the interior was painted black but the top of the doors required wood panelling. This was achieved by simply cutting up photographs I had taken of some household stained wood furniture and gluing them into place, then edging them with strips of adhesive metal foil. Now that the interior was complete I could gauge how big the figures needed to be and then formed the basic shapes out of more Milliput. When it was set I carved and sanded the detail into the surfaces but although my Parker figure was a reasonable representation I have to admit that Lady Penelope looked a bit like a man! The next problem to surmount and one I was dreading, was the making of the large bubble canopy. To accomplish this I first had to carve the shape of the bubble (slightly smaller than required) out of balsa wood, coat it with epoxy resin and sand it smooth to obliterate the grain as any marks would show up in the final product. The 'glass' itself was thin transparent plastic sheeting that was heated over an electrical element until it began to sag, then gently pulled over and around the wooden pattern. When it had cooled down it was removed from the pattern and the excess plastic was cut away so that it would fit perfectly to the bodyshell. It sounds easy but it wasn't as it didn't work. This simple technique works well for small items but for such a large shape I ran into problems and couldn't get a perfect result. However as the canopy features a frame, that effectively splits the bubble into four sections, I was able to assemble a perfect canopy from different pieces of plastic mouldings. The bumpers were now blocked out in thick Plasticard, that was screwed to the bodyshell, with the round edges being formed in epoxy putty. Holes were drilled into the front and rear body panels and recesses made to house the light units which were made from painted kit parts. The bodyshell was now finished off by making the thin raised edging that goes around the bottom of the car. The chassis was mostly made from thick Plasticard with the six wheels being paired off onto brass tube axles. To create the spring suspension effect the rear axle was fixed to a piece of sponge foam while the front axles were fitted to a strip of plastic that was only connected to the chassis at one end, the flexing of the plastic therefore creating a spring effect. Final details included the radiator made from plastic, aluminium tubes for the exhausts and steel wire for the two radio aerials. Most of the model was painted with cellulose car paint with enamel paints used for the interior and underneath. The first coat of paint was spray filler, a thick primer that is cut back with wet & dry paper to give a smooth surface finish. Then it was white spray primer followed by the pink finish - which isn't available in a spray can so I had to mix it and brush it on. |
I thought this would result in a poor finish but it looked fine when I had finished. The cellulose paint dried very quickly, almost as I applied it, so it was a case of working very fast and not getting stuck at any one point for long. By sticking masking tape on the model ,where the doors seams were supposed to be, I was able to make the task easier by spliting the process in two and paint the front and back ends at different times. After a few days the paint was rubbed with a cutting agent and the result looked like a spray finish. |
|
|
The model was finished, and I placed it on a display shelf with my other Thunderbird models, but although I was pleased with the result it was obvious that something was wrong and it didn't actually look like the model in the film. The problem was chrome parts, or to be more accurate the silver painted parts, as 'chrome' from a spray can usually looks just like silver paint! |
I decided that I was going to have to do something with the model to correct, it but not just then as I had to put it on display at the 1990 Gerry Anderson Convention. As with previous conventions I took a number of models with me and helped to run the display with a group of my fellow model makers. Gerry Anderson as usual wandered around but this time seemed to take more interest in the display than he normally did. He finally approached us and to our suprise asked if we would like to lend him some models for use in a television commercial that he 'might' be making. It was an exciting time for us all, and it seemed like a dream, but a few weeks later a telephone call requested that my Fab 1 was indeed required and so off to London it went. |
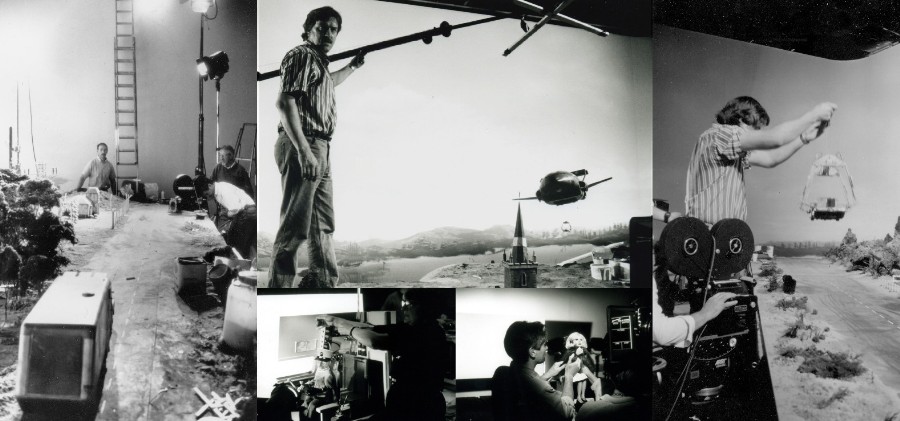
Behind
the scenes on the first Swinton Insurance 'Thunderbirds'
shoot (1990). |
 |
 |
The
advert was part of a series (which also included the
'Flintstones) for Swinton Car Insurance, and was entitled
'Parker's Day Off'' Advert above right; Several months later another (10 second) advert was produced simply called 'Brains'. Again at the wheel, Lady Penelope calls Brains to ask about car insurance and he advises her to call Swinton. In the final shot we see why she needs it, as Fab 1 hangs off the edge of a cliff! |
| The first commercial has been put on You-Tube by several people and you can see it there. This is a link to the best version I've seen - HERE |
 |
| The
model ended up in the hands of John Weller who made many
improvements. The bottom of the model was removed and a
new chassis was built including steering front wheels and
a motorised rear axle. Best of all the chrome parts were
made from chromed metal and Lady Penelope looked a lot
better. However modification work did damage the interior
details and the left side of the model which resulted in
the car being filmed 'right for left' with the film being
flopped to reverse the image. Therefore the car is
outfitted with a 'reversed' reading front number plate. The motor on the rear wheels is only used in one shot, with the model being pulled along on a wire or rod for the rest of the time, just like the original 1960s models. The space behind the rear axle was covered in green dust and probably housed some sort of smoke emitting device. The model is now one of my oldest and could do with refurbishment to correct a few problem areas, but that would destroy it's 'as filmed condition'. As one of my earlier models its not too bad shape wise but the sides are wrong. I made the sides vertical but they should angle inwards towards the bottom, unfortunately I couldn't see this from the profile photos and its only really evident when you see the open door on the puppet version. |
 |