![]()
Scratchbuilding Battletank from Gerry Anderson & Christopher Burr's Terrahawks
|
|||||
 |
|||||
 |
|||||
 |
|||||
Like previous shows Terrahawks features an elite organisation with a core group of vehicles assigned to each character. As we model makers are also usually collectors this concept is appealing because it means we can build them all and have 'a set'. With the series having been made more recently than most the prospects were good that all the model kit parts were still available, which together with some excellent reference material from collector Phil Rae, meant that I could build all the models to studio scale with ease. Although my favourite craft is the Battlehawk I decided to start with the easiest model Battletank and relied on the Engale Blueprint (drawn by Phil) together with the profile photographs he had used. Luckily with this vehicle we are only talking of two original studio models - and not the usual half-dozen different looking versions! |
The Build by David
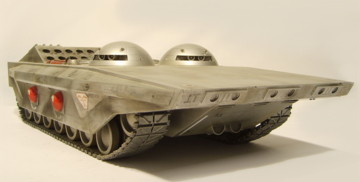
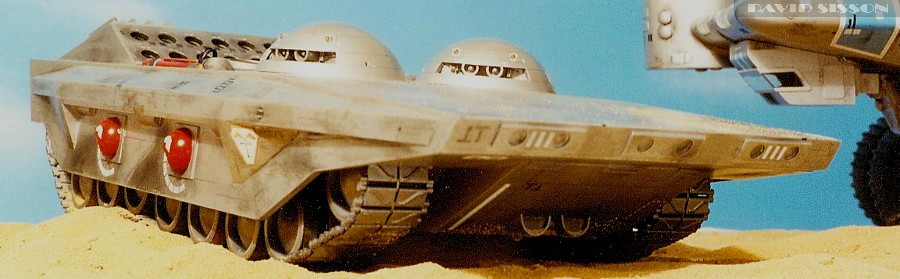
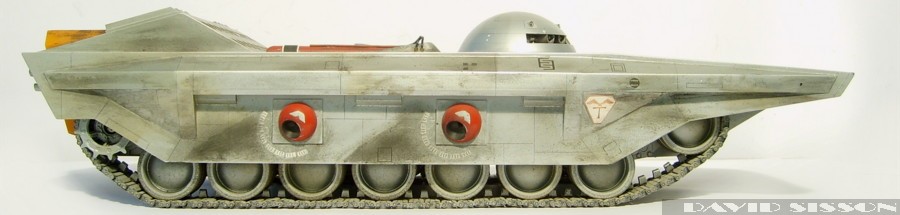
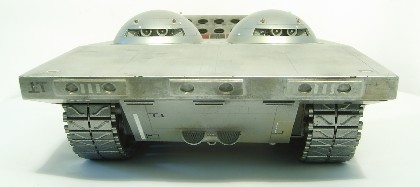
Sisson For long shots and views of the tank being dropped from the big Battlehawk model a small version was built using the 1/35th scale Tamiya Kampfpanzer Leopard kit. This wasn't too convincing when it was dropped because it didn't bounce at all well - even in slow motion. The model that did bounce very well and look terrific was a 20" version based on the 1/16th Tamiya Leopard A4 radio-controlled kit. This is a lovely kit with hundreds of parts to construct the fully sprung suspension complete with individual metal tracks - unfortunately it does cost a few quid! I found that prices ranged from £175 to £230 in my local shops and even with buying the cheapest this replica ended up costing me nearly £300 to construct. The first stage was to
construct the chassis straight from the kit; the
blueprint for the top half can then be drawn to fit it.
The only task I had here was to make the hubcaps - fairly
simple I thought but its strange how the simple things
can catch you out. Because the hubcaps are recessed
inside the wheels they don't show up on the blueprint and
you can't really tell their exact shape from the side
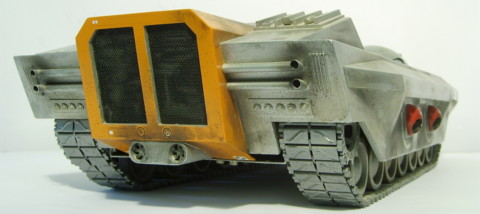
photos. Now I could begin to construct the top half which being almost entirely flat surfaces I would normally do using Plasticard. However as the areas were so large I decided to use 4mm Perspex, which at the time was a new material for me and I found it a little bit strange trying to make a model out of transparent parts. So the first job with Perspex is to rub it down, with wet & dry paper, to give it a frosted appearance so that you can actually see what you are doing. Only seven pieces of Perspex were needed to form the basic shape making the model an easy build compared to something like Thunderbird 2. Unfortunately the drawback is that a small mistake can affect more of the model and therefore become a big mistake. So several dry runs were made in assembling the parts and getting the angles right. With the main shape formed detailing could begin, using mostly Plasticard, and first to be built was the side extensions - which brought my next problem as I disagreed with the blueprint. After constructing one side I thought it looked wrong and even though my calculator said it was right my eye told me it was not appearing to extend far enough out. After much thought I decided to build the other side slightly differently and then compare both sides to publicity photographs - this second side looked better so the first side was broken down and rebuilt. The rear missile section was now built using a piece of 4mm Perspex for the front panel with the rest being done in 1mm and 2mm Plasticard. The eighteen missile tube openings were quickly drilled out smaller than required then enlarged by hand, correcting any slight positioning errors in the process. Kit parts were glued behind the Perspex panel to form the inside of the tubes and more parts from a 1/35th scale Panzerkampfwagon IV were added to the top of this section as surface detailing. The engine section that extends off the back of the model was formed in 2mm Plasticard with the large grill vents made using the metal mesh from the kit. Below these grills are twin-propeller tubes for aquatic outings; built from plastic tubes and covered over in thin plastic sheet, the propeller shapes are simply cut from small tank wheels. The main feature on the top of the tank are the two Megazoid robot drivers that I first tried to heat-form out of Plasticard but quickly gave up and ordered two plastic hemispheres from EMA Products. These parts are shaped like the previously mentioned hubcaps - in this case they are 82mm hemispheres that have been cut down in size by having 11mm sliced off the bottom rim. Detailing is simple but has to be done carefully as the two Megazoids are an eye-catching feature that are also close together and their detail must match or it would look odd. The eye slits were drilled and filed to the correct shape then I used a twin set of assorted kit parts for detailing. The small guns above each eye are thin brass tubes outfitted with small grain of wheat light bulbs. The Megazoids were painted separately from the rest of the model and added at the very end of construction. They were not given any weathering but kept in a pristine condition to suggest that they were a separate item from the rest of the tank - although in the series it was never shown that they could separate from it. The panel detailing was just done using a black pen, a compass being used to draw the lines on the top half while the lower lines could be done by supporting the pen horizontally and rotating the hemispheres against it. The last major detail
was the loading hook, something that featured in the
preproduction artwork and publicity photographs but
strangely never in any of the 39 episodes. In its normal
position it is half buried in the hull which meant that I
had to cut a recess right across the top of the model. As
it is also deeper than the 4mm Perspex I had to add more
layers to the inside to create this trough and strengthen
up the hull. The loading arm itself has an oblong
cross-sectional shape. I made this by using four railway
chimneystack kits. More bits of Plasticard were glued inside the hull to strengthen the joints and to set the ride height of the hull on the chassis. Most of the hull is a removable shell but the lower front section is bolted and glued to the chassis. Screws in this part hold the two parts of the model together. At the time I made this model I was applying cellulose car paints and I used Ford Silver Fox Metallic (which I now think is wrong - it should be a shade darker) Ford Signal Orange (Correct) and Ford Sunset Red for the hook and vertical thrusters (which do rotate - like on a Harrier jump-jet). Panel lines were drawn on with black biro except for those on the front bonnet area. As this front piece is so featureless they obviously decided that it needed more than biro, so the lines are scribed in. A number of Letraset transfers were used for detailing, although for the markings around the thrusters I ended up using small pieces of white adhesive paper. The Terrahawk logos are photographs that I took of a record sleeve that I had repainted to get the right gold and black colours. I got the size by judging the correct distance required for the photographs to print out at the right dimensions and then taking a few slightly further away/slightly nearer to cover for any miss-judgement. It's a bit easier now with computers! |
|
 |
Finally the model was dirtied down, and dirtied down, and dirtied down. In fact every few months I would look at it and think it needed more. Previous Gerry Anderson models had panelled effect dirt but the Terrahawks models introduced a more general overall filthy look. I used a lot of black enamel paints but in the end had more joy by smearing on some aluminium paint with a rag to create a stained appearance. |
I choose not to add the two big aerials at the back of the model. I decided they were too big and would either keep catching on surrounding objects or stick in my eye! |
 |
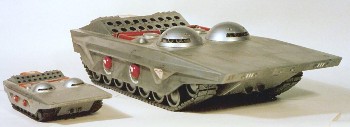 |
Big & small versions - an early model built from Plasticard using Ping-Pong balls for Megazoids. Not too bad a model considering its age and my experience at the time - I always kept it because I knew that one day I would build the big Battlehawk. |
Back to INDEX .......... or see original Battletank in Terrahawks Behind-the-Scenes
 |