![]()
Scratchbuilding Treehawk from Gerry Anderson & Christopher Burr's Terrahawks
|
|||||
| Gerry
Anderson repeated the idea on Terrahawks but this time I
got the impression that he was having a bit of a laugh,
as we had the mighty Battlehawk taking off through a
Mansion house and Hawkwing launching underwater - via a
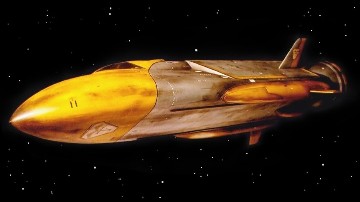
spinning Lake! Then we had Treehawk, the regular short-range space vehicle, which like its name implies comes out of the centre of a tree. Not too interesting compared to the others but equally silly when you realise just how big this tree would need to be! |
|||||
|
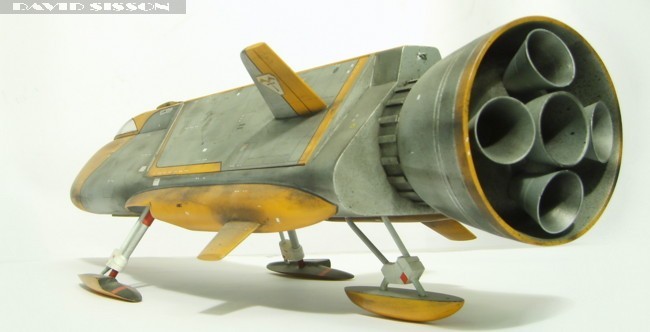
The offshoot of this idea was to restrict the overall design, creating a narrow sleek bullet-shaped craft. Because of this it is probably the least interesting of the Terrahawk vehicles, although like Battlehawk I thought Steven Begg's preproduction artwork was a far better looking idea. Although I do now like the Terrahawk models I don't want to find myself building them over and over again in the future as I have with my Thunderbird fleet. The general idea is to try and build them correctly the first time round and the best way of doing that is to build them to same size as the originals, making this model 22 & 1/2 inches long.. The Build by David
Sisson |
The first task was
to draw up the blueprint and luckily I had a photocopy of
the original working drawing to guide me. So I just had
to spend a few hours comparing it to pictures of the
finished studio model and altering it in a few areas to
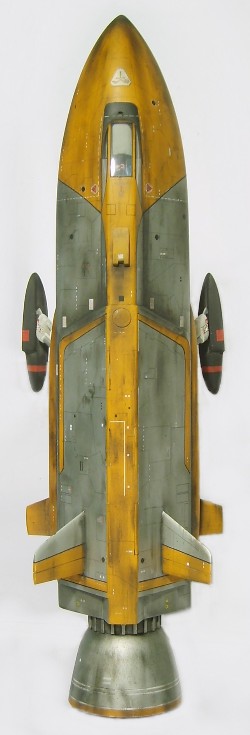
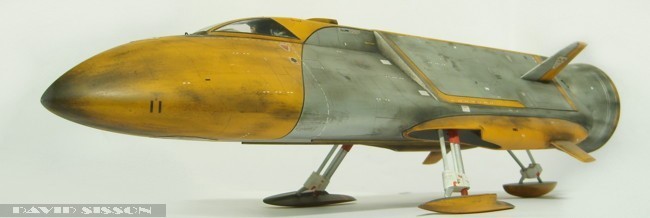
match. The nose section was then carved from a collection of pre-cut Balsa sheets which were glued together to form a solid mass. This was done by first cutting out the side profile from a single sheet of wood that became the centre of the nose. The spaces on either side were then filled in with horizontal layers of Balsa cut to the shape of the top view plan. This gave me the general shape required so again I just had to round off the edges which with soft Balsa doesn't take that long. In fact the problem with Balsa is that it's often too easy to remove more wood than you need to, which is why many model makers prefer harder woods. Unfortunately the opposite effect can then manifest itself as often not enough material is removed and the models can end up looking a bit square and blocky. With the basic shape now formed I would usually make plaster moulds and cast the model in fibreglass, however as I had no intention of ever building a duplicate I decided not to waste any time and just use this master pattern as the final model. So the soft wood was given three coats of SP113 epoxy resin and then rubbed down with wet & dry paper to create a nice tough smooth finish. I don't really like using hardwood, but at this stage it was necessary because I needed to use it to make the two side fairings. These parts were created from one-inch dowel that I split down the middle and glued to the sides of the hull, then P38 filler was used to blend the parts into the rest of the fuselage. These hardwood fairings took a lot of effort to shape and when they did finally look correct I then had to drill out and remove the front sections as they form part of the undercarriage. The ragged holes in the fairings were smoothed over and reformed with car filler. Then the area was carefully covered over in electrical tape, more filler was applied and the rough wood pieces that had just been removed were pushed back into place. After the filler had set the surplus bits were cut away and the wooden footpads prised away from the surface of the tape - that had acted as a barrier to prevent the filler adhering to the hull. The undercarriage parts could now be sanded down to their correct shape whilst always checking that they still fitted perfectly into the recesses. The wooden parts were coated in resin, sanded again and finally spray-painted. The next step was to
form the top section and wing areas in mostly 2mm
Plasticard with the recessed spaces having to be cut out
of the wooden hull. The wings themselves were made from
two layers of plastic with the fins being cut from
Perspex and shaped on my beltsander. The resin coated wood
hull was given several coats of spray filler and then
sanded down, any minor pinholes or blemishes would show
up at this stage and could be fixed. The wings were now
carefully attached and the gaps around the edges,
especially next to the hinges, were filled to achieve a
close fit for the moving parts. The cockpit area was
given some detail and outfitted with a pilot figure in
line with the original design. (In later episodes the
cockpit became a two-seater) The transparent window area
was heat formed from 0.75mm plastic, glued in place with
two-part quick setting epoxy and blended into the rest of
the upper structure with car filler. The last major piece to
be built was the large engine bell at the rear of the
model. To make this part I firstly glued a smaller rough
basic shape to a wood base to form the core, then cut the
outline shape from a piece of 2mm Plasticard which had a
pin fixed to the centre which could be inserted into a
hole drilled in the top of the core. Wet plaster of Paris
was then applied to the core and the plastic stencil
rotated to form the desired shape. This plaster master
wasn't good enough to use itself so I then heat moulded a
sheet of Plasticard around it and used this to cast a
duplicate in P38 car filler. This filler master could be
sanded and reshaped to the correct dimensions, and when
it was done a plaster mould was made and the final part
produced as a thin fibreglass casting. The model was now sprayed with cellulose motorcar paints, Signal Orange (correct) and Silver Fox - which is a little bit wrong because it's too light and I've had to heavily weather the model to try and correct it. Panel lines were drawn in using a standard black biro and I've lightly scored the surface to catch some of the weathering. The Terrahawk markings
were photographs, taken of the emblem printed on the back
of a record sleeve, which I had retouched to correct for
colour defects. As the photo paper isn't as thin as a
decal I tried to minimise its extra height in the
painting stage. By applying masking tapes to the model,
cut to the same shape as the Terrahawk symbols, I could
create slightly recessed areas in the finished hull
surface that the markings could fit into. The last problem was deciding what to do with the undercarriage, as I didn't want to fix it in either the up or down position. In the end I decided to construct the legs from an assortment of brass tubes and Perspex blocks that can be pushed together or taken apart at will. However the model looks far more interesting with the legs down, so that's its normal appearance. |
|
 |
When the original model was first filmed it was rather clean in appearance, but for later episodes they really dirtied it up. I've gone for a fairly dirty look myself, but a lot of it tends to disappear in photographs. I fitted metal hooks at the front and rear, for attaching wires for display purposes. |
Back to INDEX .......... or see original Treehawk in Terrahawks Behind-the-Scenes
 |